Desserts
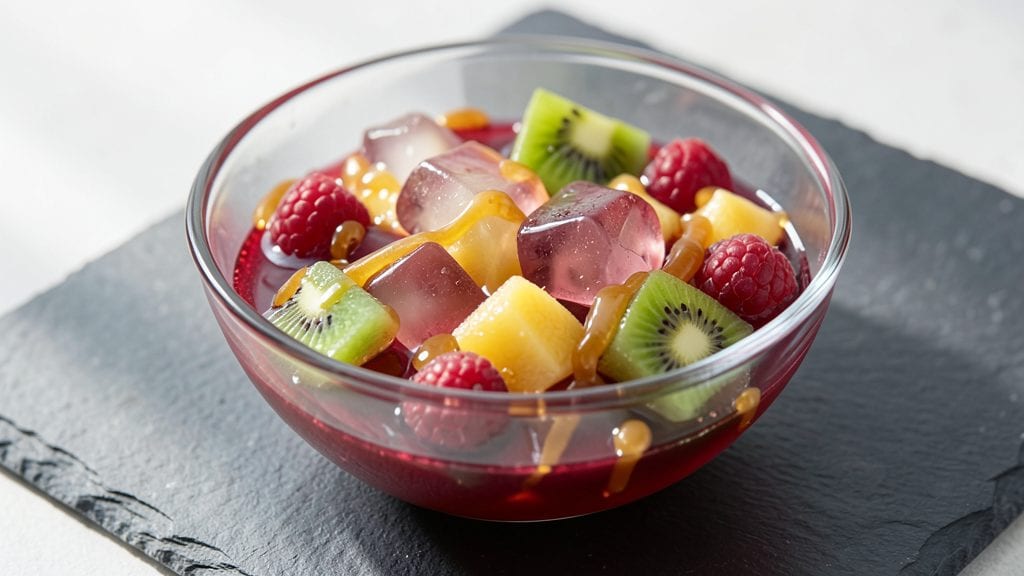
Creating an ice jelly recipe that delivers that signature wobble and vibrant fruit infusion is simpler than you’d expect—especially when you work with agar-agar for a clean, firm set.
This method transforms basic ingredients into a dessert that feels luxurious yet requires just 10 minutes of active time, with the rest handled by science (and patience).
The key lies in balancing the agar ratio and fruit concentration to avoid a gummy texture or watery result, both of which I’ve perfected through trial and error.
The beauty of this recipe is its versatility—whether you’re aiming for a tropical twist with mango and passionfruit or a classic berry blend, the technique remains the same.
You’ll need just five core ingredients (plus your choice of fruit), and the process is foolproof once you master the boiling and cooling phases.
The agar-agar dissolves completely in hot liquid, then sets into a silky, jiggly texture that holds its shape when unmolded, making it ideal for plating with precision.
What you’ll end up with is a dessert that’s equal parts elegant and playful: bright, translucent layers with pockets of fruit pulp suspended in the jelly, offering a burst of flavor with every bite.
The texture is light yet structured—never slimy or overly sweet—and the presentation is restaurant-worthy without requiring advanced skills. Serve it chilled in elegant glasses for a sophisticated touch, or cut into cubes for a refreshing snack.
This recipe also adapts seamlessly to dietary needs—swap honey for maple syrup for vegan versions, or infuse with herbs like mint or basil for a savory twist.
The possibilities are endless, but the foundation remains the same: precision in measurement and timing. Let’s get started on creating your own wobbly masterpiece.
Ingredients for ice jelly
Five core ingredients plus your favorite fruit—this jelly transforms simple elements into a restaurant-worthy dessert.
| Ingredient | Amount | Notes |
|---|---|---|
| Agar-Agar Powder 🍶 | ½ tsp | High-quality, powdered agar-agar |
| Water 💧 | 1 cup | Filtered for clarity |
| Honey 🍯 | ½ cup | Raw or clover variety |
| Fresh Fruit Pulp 🍓 | 1 ½ cups | Mango, passionfruit, or berries |
| Lemon Juice 🍋 | 1 tbsp | Freshly squeezed, for brightness |
| Silicon Jelly Molds 🧊 | 4 whole | Small or medium size |
| Ice Cubes ❄️ | 1 cup | For cooling fruit pulp |
| Fresh Mint Leaves 🌿 | ¼ cup | Optional garnish, chopped |
Agar-agar is the secret weapon here—Japanese brands like Koyo or Amazon bulk packs are my go-tos. It dissolves completely in hot liquid, so no grainy texture. The fruit pulp is where flavor shines: passionfruit or mango for tropical vibes, or mixed berries for classic appeal. If using frozen fruit, thaw it first and strain out excess liquid. For the honey, raw or clover adds depth without overpowering—avoid processed varieties that can crystallize. The lemon juice brightens everything, so don’t skip it, even if your fruit is tart.
No agar-agar? Kappa kombu seaweed powder works in a pinch (use half the amount), but texture won’t be as firm. Substituting honey? Maple syrup or agave keeps it vegan—just reduce by 10% since they’re sweeter. For fruit, blend and strain to remove seeds and skins, then chill the pulp with ice cubes to prevent browning. The jelly molds? Amazon or kitchen supply stores have affordable sets—look for food-grade silicone. If you’re garnishing, fresh mint leaves add a sophisticated touch, but skip them if you prefer a fruit-forward flavor.
This jelly sets best when chilled for at least 4 hours, ideally overnight. Store leftovers in an airtight container with a thin layer of water on top to keep them moist—lasts 5 days in the fridge. For freezing, portion into single servings and thaw at room temperature for 30 minutes before unmolding. The texture stays perfect if you avoid reheating, but if you must, warm gently in the microwave for 10 seconds—just enough to soften the edges.
Why You'll Love This Recipe
- No Boiling Fiasco: I swear by this method—just heat water, stir in agar-agar, and let it bloom. No lumpy messes, no constant stirring like with gelatin. That powder dissolves like magic, and honestly? It’s the only way I make jelly now.
- Sweet-Tart Magic: The honey and lemon juice balance the fruit pulp so well—bright, smooth, and just sweet enough to make you want seconds. I’ll be real: my kids fight over the last piece, and I’ve never seen that happen with store-bought versions.
- Party in a Jar: This is my go-to for potlucks, picnics, or even a lazy Sunday brunch. Pack it in mason jars, and it’s ready to grab-and-go—no plates, no mess. (Yes, even on a Tuesday night when you’re pretending to be organized.)
- Zero-Waste Win: Use up overripe fruit, bruised berries, or whatever’s left in the fridge—it all works. And the leftovers? They keep for weeks in the fridge, so no sad wilted fruit here. Budget-friendly, practical, and guilt-free.
Step-by-step instructions for ice jelly recipe
This method delivers perfectly set, wobbly fruit jelly in minutes—crisp, refreshing, and bursting with flavor.
Prepare the Fruit Base
In a medium saucepan, combine the 1.5 cups fresh fruit pulp with the 1 cup ice cubes. Stir gently to chill the mixture while preventing the fruit from breaking down further. Place the pan over low heat and add the 0.5 cup honey, stirring constantly until the honey dissolves completely. This step ensures a smooth, cohesive base without graininess.
Next, remove the pan from heat and whisk in the 1 tbsp lemon juice. The acidity brightens the fruit flavors and helps stabilize the agar-agar later. Let the mixture cool to room temperature—this prevents premature gel formation and ensures even setting. I like to place the pan in an ice bath for 5 minutes to speed this process while maintaining clarity.
Activate the Agar-Agar
While the fruit mixture cools, measure the 0.5 tsp agar-agar powder into a small bowl. The key here is to sprinkle it directly over 1 cup cold water in a separate container. Let it sit for 2 minutes—this creates a slurry that disperses evenly without clumping. Never heat the agar-agar dry; it burns easily and loses its gelling properties.
Once the fruit mixture reaches room temperature, gently pour the agar-agar slurry into the pan. Stir continuously for 1 minute to fully incorporate. Return the pan to low heat for exactly 1 minute—just until small bubbles form along the edges. This brief heating activates the agar-agar without overcooking the fruit. Remove immediately to prevent a rubbery texture.
Pour and Set the Jelly
Divide the warm jelly mixture evenly among the 4 whole silicon jelly molds, filling each about ¾ full. Tap the molds gently on the counter to release any air bubbles trapped in the jelly. Place them in the refrigerator and let set for at least 3 hours, or until completely firm to the touch. The longer they chill, the more pronounced the wobble becomes—this is what makes these jellies so satisfying.
I recommend using a timer for this step. The jelly should hold its shape when gently tapped, but still yield slightly when pressed with a finger. If you're impatient, you can accelerate setting by placing the molds in the freezer for 1 hour, though this may slightly alter the texture.
Garnish and Serve
Once fully set, carefully remove the jelly from the molds by running a small knife around the edges. Place each jelly on a serving plate and garnish with a sprinkle of 0.25 cup chopped fresh mint leaves. The mint adds a refreshing contrast to the sweet fruit flavors and enhances the visual appeal. Serve immediately for the perfect balance of crisp texture and vibrant taste.
For an extra touch, drizzle a thin stream of honey over the top just before serving. This not only adds visual appeal but also creates a delicate sweet coating that enhances each bite. Store any leftovers in an airtight container in the refrigerator for up to 5 days, though they're best enjoyed fresh.
Pro Tips For Making Ice Jelly
- Boil Agar-Agar Fast: Toss the agar-agar powder into the water before heating—it dissolves smoother when stirred in cold. I used to sprinkle it in later and end up with clumps that turn my jelly into a lumpy mess. A 2-minute simmer on medium-high is enough; boiling it longer makes the texture rubbery.
- Strain Fruit Pulp Twice: Run the fruit pulp through a fine-mesh sieve twice—once after blending, once after mixing with the agar solution. The second strain removes those stubborn fiber bits that turn your pretty jelly into a chewy mouthful. Save the pulp for smoothies instead.
- Chill in Ice Water: Pour the hot jelly mixture into shallow containers and set them in a bowl of ice water for the first 10 minutes. It sets faster and more evenly than fridge-chilling alone, and you’ll get that perfect wobble instead of a gummy block. (Yes, even if you’re impatient like me.)
- Add Lemon Juice Last: Mix the lemon juice in after the agar solution cools to 100°F (38°C)—not during boiling. Too much heat turns the acid bitter, and you’ll end up with a jelly that tastes like over-sour lemonade. A splash at the end keeps the flavor bright and balanced.
Regional styles of ice jelly
Japanese Snow Skin
In Japan, this dessert is known as yukigashi (雪皮), a delicate, translucent jelly that’s often served in elegant teahouses. The traditional version uses agar-agar and kuromitsu (black sugar syrup) for a deep, caramelized sweetness.
I love making it with matcha powder (½ tsp) mixed into the fruit base for an earthy twist—it pairs beautifully with strawberry or lychee pulp. Serve in miniature glass cups for a high-end presentation, and garnish with edible gold leaf for a luxurious touch. 🍵
Thai Tropical Twist
Thai chefs elevate ice jelly with palm sugar syrup (replace honey with ½ cup dissolved palm sugar) and infuse it with pandan leaves or kaffir lime zest for an aromatic kick.
I blend young green coconut flesh into the fruit pulp for a creamy texture, then stir in 1 tsp pandan extract before setting. Serve chilled in halved coconut shells for an authentic presentation. For extra flair, top with toasted sesame seeds and a sprinkle of crushed roasted peanuts. 🌴
Vietnamese Chè (Sweet Bean Jelly)
In Vietnam, this jelly becomes chè lạnh (iced dessert) by incorporating mung bean or black sesame paste into the fruit base. I blend ½ cup cooked mung beans with the fruit pulp for a nutty depth, then sweeten with rock sugar instead of honey.
The texture becomes slightly chewier, resembling traditional black sesame jelly. Serve in clear glass bowls with a scoop of coconut ice cream on top. For a modern twist, add crumbled pandan jelly cubes for contrast. 🍡
Middle Eastern Rosewater Delight
Middle Eastern desserts often feature rosewater and orange blossom water—perfect for ice jelly! I mix 1 tsp rosewater and ½ tsp orange blossom water into the fruit base, then use pomegranate or apricot pulp for a vibrant color.
Garnish with toasted pistachios and a drizzle of rose syrup before serving. For extra richness, layer the jelly with whipped mascarpone cheese in the mold. Serve in small copper cups for a festive touch. 🌹
Latin American Tamarind Version
In Latin America, tamarind is a staple for tangy-sweet desserts. I blend ½ cup tamarind paste (soaked and strained) into the fruit base, then use mango or pineapple pulp for brightness. Sweeten with piloncillo sugar (unrefined cane sugar) for a caramelized depth.
Serve in hollowed-out pineapple halves or mini clay pots for an authentic presentation. Top with chopped cilantro and a sprinkle of tajín for a zesty kick. 🌶️
Nutrition facts
Frequently asked questions
Can I use gelatin instead of agar-agar for this recipe?
No, you shouldn't substitute gelatin for agar-agar in this recipe. Gelatin requires animal products (like bone broth) and creates a softer, less firm texture that won't hold its shape as well when unmolded. Agar-agar is plant-based, sets cleaner, and delivers that signature wobble—plus, it works beautifully with dairy-free sweeteners like maple syrup.
Why did my ice jelly turn out too soft or watery?
This usually happens when the agar-agar wasn't heated long enough or the mixture cooled too quickly. Always heat the agar-agar slurry for exactly 1 minute until small bubbles form, then let it cool to room temperature before pouring into molds. If it still feels weak, try increasing the agar-agar by 0.1 tsp next time.
How can I make this jelly without fruit?
For a fruitless version, replace the fruit pulp with 1 cup strong brewed tea (like hibiscus or matcha) or ½ cup coconut milk for a creamy texture. Add 1 tsp vanilla extract or ½ tsp citrus zest for flavor. The key is balancing the liquid-to-agar ratio—reduce the water by ¼ cup if omitting fruit to maintain firmness.
Can I make ice jelly ahead of time?
Yes! This jelly actually tastes better when made a day in advance. Store it in an airtight container in the fridge for up to 5 days, covered with a thin layer of water to prevent drying. For freezing, portion into single servings and thaw at room temperature for 30 minutes before unmolding—never microwave directly from frozen.
What's the best way to unmold the jelly without breaking it?
Run a small, flexible knife or offset spatula around the edges of the mold to loosen it, then gently tap the base on the counter. For stubborn jellies, dip the mold in warm water for 10 seconds to soften the edges. Work quickly to avoid melting—always unmold onto a chilled plate to prevent warping.