Appetizers
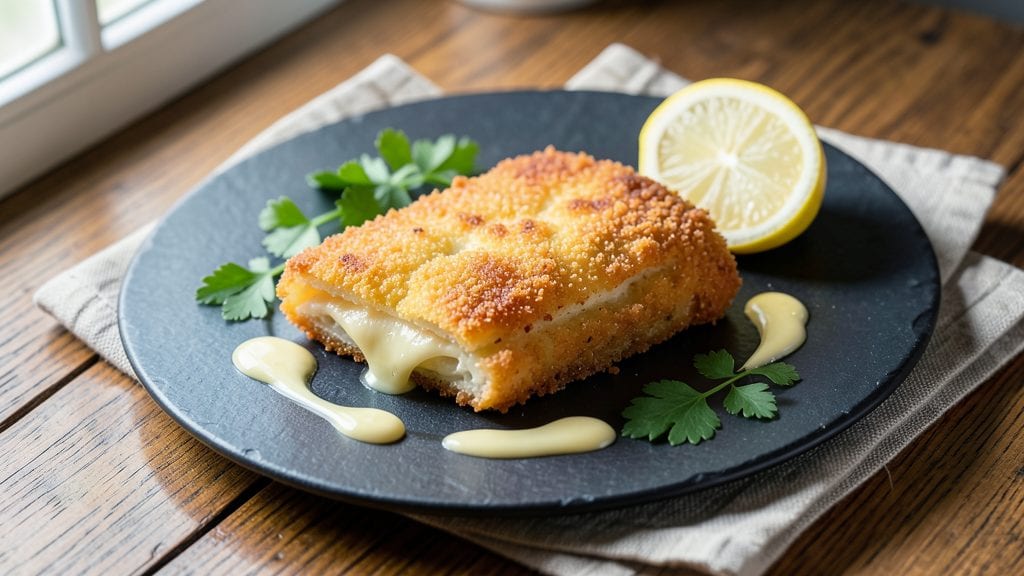
This cheese schnitzel recipe delivers the perfect balance of crispy golden breading and juicy centers that make every bite irresistible. The secret lies in proper protein preparation and a precise breading technique that creates a shield against moisture loss while frying.
I've perfected this method over years of testing, ensuring the cheese melts just enough to create pockets of gooey goodness without turning the schnitzel into a greasy mess.
The process begins with thin, even-cut chicken cutlets that are pounded to uniform thickness—this ensures even cooking and maximum crispiness. A three-step breading method (flour, beaten egg, and fine breadcrumbs) creates that signature crunch, while a high-heat frying technique locks in juiciness.
The right cheese selection (Emmental or Gruyère works best) melts perfectly, adding rich flavor without overwhelming the dish.
What you'll end up with is restaurant-quality schnitzel that's golden on the outside, tender on the inside, and oozing with melted cheese in every bite. The aroma alone will have everyone gathering around your kitchen, and the texture contrast between crispy breading and juicy meat is pure satisfaction.
Serve with lemon wedges and a simple salad to complete the meal.
This recipe works equally well for weeknight dinners or special occasions, scaling easily to feed a crowd. The technique is straightforward once you understand the key steps, and the results are always impressive. Let's get started on creating your perfect cheese schnitzel.
Ingredients for cheese schnitzel
Fourteen ingredients for restaurant-quality schnitzel—crispy, juicy, and cheesy perfection in every bite!
| Ingredient | Amount | Notes |
|---|---|---|
| Boneless, Skinless Chicken Breast 🍗 | 1 ½ lb | Pounded to 1/4-inch thickness |
| All-Purpose Flour 🌾 | 1 cup | For first breading layer |
| Large Eggs 🥚 | 2 whole | Beaten with 1 tbsp water |
| Fine Breadcrumbs 🍞 | 1 ½ cups | Panko for extra crispiness |
| Gruyère Cheese 🧀 | 1 cup | Shredded, or Emmental |
| Unsalted Butter 🧈 | 1 cup | Melted, for cheese mixture |
| Olive Oil 🫒 | 2 cups | For frying, high smoke point |
| Salt 🧂 | 1 tsp | Kosher or sea salt |
| Black Pepper 🌶️ | ½ tsp | Freshly ground |
| Lemon Wedges 🍋 | 2 whole | For serving |
| Garlic Powder 🧄 | ½ tsp | For cheese mixture |
| Paprika 🌶️ | ½ tsp | Smoked, for garnish |
The chicken is everything here. Boneless, skinless breasts are your best bet—pound them to 1/4-inch thickness for even cooking. Costco or Trader Joe's often have pre-cut cutlets, but grab whole breasts if you want to save money. Look for fresh, plump fillets with no gray edges—they should feel firm to the touch. If you're feeling fancy, free-range chicken adds extra tenderness, but regular works just fine. Pro tip: Let the chicken sit at room temperature for 20 minutes before breading—this ensures even cooking and maximum crispiness.
No Gruyère? Emmental or sharp cheddar are solid swaps, though Gruyère melts like a dream. Short on breadcrumbs? Crushed cornflakes add crunch without bulk. The key to that perfect three-step breading is patience—don't rush the egg wash or the breadcrumb coating. For the cheese mixture, melt the butter first, then mix in the cheese and spices. If you're feeling lazy, skip the garlic powder and paprika, but trust me, they add depth. The olive oil for frying? Light or refined is best—it won't overpower the flavor. And don't skip the lemon wedges—bright acidity cuts through all that richness.
This isn't a dish you want to reheat—make it fresh, or you'll lose that perfect crispiness. But the prep ahead? Absolutely. Pound and bread the chicken up to 24 hours ahead—store it in the fridge, uncovered, so it doesn't steam. The cheese mixture keeps for 3 days in the fridge, sealed tight. For serving, keep everything at room temperature—10 minutes is enough. And if you're feeding a crowd, double the batch but fry in batches of two to avoid overcrowding the pan. Trust me, the aroma alone will have everyone rushing to the table.
Why You'll Love This Recipe
- Same recipe, different vibes: toss it on the stove for a quick weeknight meal or bake it golden for guests. The cheese makes it feel fancy without the fuss—my secret for looking like a pro.
- Pantry-Friendly Magic: I swear by this recipe when I forget to grocery shop—just flour, eggs, breadcrumbs, and that one block of Gruyère I always have lurking. No specialty items, no last-minute panic.
- Crispy-Creamy Obsession: That first bite? Crunchy breading gives way to melty Gruyère, and the chicken stays juicy—no dry, sad cutlets here. Honestly, it’s the kind of dish that makes me forget takeout exists.
- Weeknight to Dinner Party: Same recipe, different vibes: toss it on the stove for a quick weeknight meal or bake it golden for guests. The cheese makes it feel fancy without the fuss—my secret for looking like a pro.
Step-by-step instructions for cheese schnitzel with perfect crisp and juice
Here's how to achieve that legendary golden crust while keeping the inside impossibly tender.
Pound and Season the Chicken for Even Cooking
Place the 1.5 lb boneless, skinless chicken breast between two sheets of plastic wrap. Using a meat mallet, pound it to an even ¼-inch thickness throughout. This ensures the schnitzel cooks quickly and evenly without drying out. I press down firmly but evenly—no need to go crazy, just until you can see the muscle fibers clearly.
Season both sides generously with the 1 tsp salt and ½ tsp black pepper. The salt should adhere to the surface rather than just sprinkling on top. Let the seasoned chicken rest for 10 minutes at room temperature while you prepare your breading station. This resting period helps the meat cook more uniformly and prevents curling during frying.
Create the Perfect Breading Station
Set up three shallow bowls. In the first bowl, place the 1 cup all-purpose flour mixed with ½ tsp paprika. In the second bowl, beat the 2 whole large eggs with 1 tablespoon water until frothy. In the third bowl, place the 1.5 cups fine breadcrumbs (Panko for extra crispiness). Arrange these bowls in order from flour to egg to breadcrumbs for an efficient breading process.
I like to use separate bowls because dipping the chicken through each station creates distinct layers that contribute to the ultimate crunch. The flour provides initial adhesion, the egg acts as a binder, and the breadcrumbs create that signature crispy texture. Keep everything ready before starting to fry—once the oil is hot, you'll want to work quickly.
Fry to Golden Perfection Using the Two-Stage Method
Heat 1 cup of the olive oil in a large skillet over medium heat until it reaches 350°F. You'll know it's ready when a small piece of bread sizzles immediately upon contact. Working in batches to avoid overcrowding, dip each chicken cutlet first into the flour mixture, shaking off any excess. Then dip into the egg mixture, letting any excess drip off, and finally coat thoroughly in the breadcrumbs.
Carefully place the breaded cutlet into the hot oil. Fry for 2-3 minutes per side until golden brown and crispy. The key is patience here—don't rush the frying process. You're looking for that deep golden color that signals perfect crispiness. I use tongs to gently press down on the schnitzel during the first minute to help it maintain contact with the oil and prevent curling.
Assemble the Cheesy Center While Keeping It Hot
Remove the fried schnitzel from the oil and place it on a wire rack set over a paper towel-lined plate. This keeps it crispy while you prepare the cheese filling. In a small bowl, combine the 1 cup shredded Gruyère cheese with the 1 cup melted unsalted butter, ½ tsp garlic powder, and a pinch of salt. Mix until smooth and spreadable.
While the cheese mixture is still warm, spread about 2 tablespoons of the cheese-butter mixture onto each schnitzel, creating a thin, even layer. The residual heat from the fried chicken will help the cheese melt slightly as you assemble. This step is crucial for that gooey, cheesy center that makes schnitzel so irresistible.
Serve Immediately with Zesty Lemon and Fresh Herbs
Return the assembled schnitzel to the skillet for just 30 seconds to melt the cheese completely. Watch carefully to prevent burning—you want that cheese to be fully melted and bubbly but not browned. Transfer to a serving plate and garnish immediately with the lemon wedges and a sprinkle of fresh parsley if you have it.
Serve the cheese schnitzel right away with lemon wedges squeezed over the top—this bright acidity cuts through the richness beautifully. For the best experience, eat immediately while the breading is still crisp and the cheese is gooey. The contrast of crispy exterior, juicy interior, and melted cheese creates a perfect bite every time.
Pro Tips For Making Cheese Schnitzel
- Pound Thin, Not Perfect: Chicken breasts have a stubborn way of staying thick—even when you think you’ve flattened them. Use a rolling pin or heavy pan to press them down to about ¼-inch thickness, then flip and pound the other side. Skip the meat mallet if you don’t have one; a zip-top bag with a few ice cubes inside works in a pinch (yes, it’s weird, but it’s the only way I’ve gotten them even).
- Egg Wash Matters: Don’t just dip the chicken in beaten eggs—whisk them with a splash of cold water (about 1 tablespoon per egg) to make the coating stick better. After dipping, let the excess drip off for 10 seconds before breading. I used to rush this, and the breadcrumbs would slide right off when frying.
- Fry in Batches, Not Crowds: Two or three schnitzels at a time is the max—any more, and the oil temperature drops like a rock, turning your golden crust into a soggy mess. Use a thermometer if you’re paranoid (350°F is ideal), but even without one, listen for a gentle sizzle. Overcrowding is the fastest way to ruin a batch.
- Gruyère, Not Just Any Cheese: Skip the pre-shredded cheese—it’s coated in anti-caking agents that make it clump and melt poorly. Instead, grate Gruyère yourself (or buy blocks and grate it fresh) for that perfect stretchy, gooey pull. If you’re in a hurry, at least use a fine cheese grater and pat the shreds dry with a paper towel first.
Pro cooking tips for cheese schnitzel
Oil Temperature Control
Your oil temperature is the single most critical factor for perfect cheese schnitzel. Use a candy thermometer to maintain 350°F—any lower, and the breading will absorb too much oil and become soggy. I swear by the Thermoworks Thermapen for accuracy.
If you don't have one, test readiness by dropping in a small piece of bread: it should sizzle immediately and turn golden in 30 seconds. Too hot? The outside burns before the inside cooks. Too cool? You'll end up with greasy, limp breading. 🔥
Preventing Curling
Schnitzel has a nasty habit of curling at the edges during frying, ruining that perfect flat shape. To fight this, press down gently with tongs during the first 30 seconds of frying—this keeps the cutlet flat against the pan. Another trick?
Chill the breaded chicken on a wire rack in the freezer for 5 minutes before frying. The cold helps the breading set faster, preventing curling. I also recommend using room-temperature chicken—cold meat from the fridge will shrink and curl as it heats.
Double-Frying for Extra Crisp
For restaurant-quality results, try a two-stage frying method. First, fry the schnitzel at 325°F for 2 minutes to cook through the center. Then increase the heat to 375°F and fry for another 1-2 minutes to crisp the breading.
This technique ensures the inside is fully cooked while the outside stays perfectly golden. Just be careful not to overcrowd the pan—fry in batches of two to maintain temperature control. The extra effort makes all the difference in texture. ⚡
Cheese Melting Secrets
The cheese should melt just enough to create pockets of gooeyness without turning the schnitzel into a soggy mess. Use Gruyère or Emmental—they melt beautifully and won’t make the breading greasy. For extra richness, mix in 1 tablespoon of heavy cream with the cheese and butter.
Spread the cheese mixture evenly and return the schnitzel to the pan for just 30 seconds to finish melting. Overheating will burn the cheese, so keep a close eye on it. The goal is a slightly bubbly, not browned, surface.
Equipment Upgrades
Investing in a few key tools will elevate your schnitzel game. A meat mallet (like the OXO Good Grips) makes pounding chicken effortless, while a wire cooling rack (placed over a baking sheet) keeps fried schnitzel crispy instead of soggy.
For frying, a heavy-bottomed skillet (such as All-Clad) distributes heat evenly, preventing hot spots. If you're frying multiple batches, a deep fryer with a temperature gauge (like the Presto 01400) takes the guesswork out of maintaining consistent oil temps.
These tools might seem like splurges, but they make all the difference in professional results. 💡
Lemon and Acid Balance
Don’t skip the lemon wedges—they’re not just for garnish. The acidity cuts through the richness of the cheese and fried breading, balancing each bite. I like to serve 2-3 wedges per schnitzel so guests can squeeze fresh lemon over their plates.
For extra brightness, add a pinch of zest from the lemon to the cheese mixture before spreading. If you’re feeling fancy, a cucumber-dill salad with a splash of vinegar provides a refreshing contrast to the richness.
The key is to serve everything at room temperature—cold sides dull the flavors of hot schnitzel.
Nutrition facts
Frequently asked questions
What's the best cheese for schnitzel?
Gruyère or Emmental are ideal—they melt perfectly without making the breading greasy. For a sharper flavor, try sharp cheddar, but avoid pre-shredded varieties (they contain anti-caking agents that prevent smooth melting). The key is cheese that melts cleanly and pairs well with the crispy exterior.
Can I use pork or veal instead of chicken?
Thin-cut pork chops or veal cutlets work beautifully—they're more tender than chicken and hold up well to the breading process. For pork, use 1/3-inch thickness and cook at 375°F to ensure doneness. Veal is especially luxurious but requires slightly lower heat (350°F) to prevent overcooking. The breading technique remains identical.
Why did my schnitzel turn out soggy?
Most likely, your oil wasn't hot enough or you overcrowded the pan. The breading absorbs oil like a sponge when the temperature drops below 350°F. Always fry in batches of two and maintain proper heat—test with a bread cube (it should sizzle immediately). Also, avoid stacking fried schnitzel—place them on a wire rack instead of paper towels to keep them crisp.
How do I make this recipe gluten-free?
Replace the flour with 1/2 cup gluten-free all-purpose flour blend and use 1/2 cup cornstarch> for the first breading layer. For the breadcrumbs, use gluten-free panko> or crushed gluten-free crackers. The egg wash remains the same, but you may need to chill the breaded cutlets for 5 minutes> before frying to help the coating adhere better. Test small batches first as gluten-free breading can be trickier.
Can I bake this instead of frying?
You can try an oven method, but it won't achieve the same crispy texture. Preheat oven to 425°F> and bake on a wire rack for 12-15 minutes> (sprayed with oil) until golden. For better results, broil for 2-3 minutes**> at the end. The breading will be lighter, and the cheese may not melt as dramatically. For true crispiness, frying remains the gold standard.