Main Courses
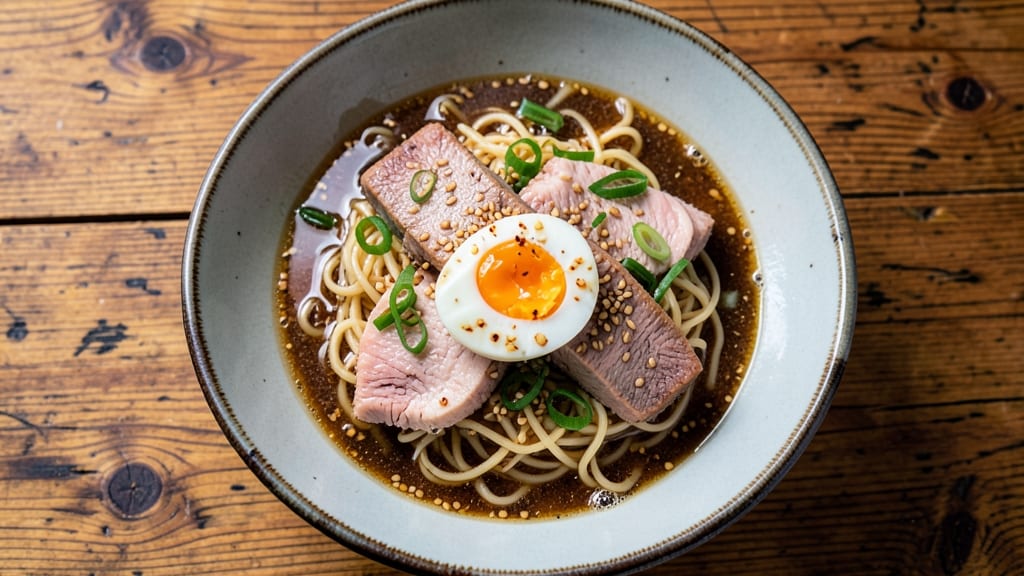
Transforming simple pantry staples into a flavor-packed bowl of canned tuna ramen is one of those meals that proves you don’t need fancy ingredients to create something restaurant-worthy. 💛 I first made this during a particularly busy week when I had exactly 15 minutes and a few cans in the cupboard—what emerged was a bowl so packed with umami and texture that even David (my official taste-tester) asked for seconds.
The secret lies in balancing the rich, salty flavor of canned tuna with a bold broth—whether you go for classic miso, spicy ramen, or a quick soy-ginger base—and then layering in toppings that add crunch and freshness.
No fancy techniques here, just boiling noodles, flaking tuna, and assembling everything in minutes. The best part? Every bite delivers that perfect mix of chewy noodles, tender protein, and crispy garnishes.
By the time you’re done, you’ll have a bowl that’s comforting yet exciting—think tender ramen noodles swimming in a savory broth, flaky tuna, and a rainbow of toppings like soft-boiled eggs, green onions, and sesame seeds.
It’s the kind of meal that’s quick enough for a weeknight but hearty enough to feel like a treat. Trust me, this is one of those recipes that’ll become a regular in your rotation.
Ready to make it? We’ll start with the broth, move to the noodles, and then build that perfect bowl of toppings. Let’s get cooking!
Ingredients for canned tuna ramen
Pantry staples meet umami magic in this quick, crunchy bowl—no fancy ingredients needed!
| Ingredient | Amount | Notes |
|---|---|---|
| Ramen Noodles 🍜 | 2 packages | Any flavor, uncooked |
| Canned Tuna in Water 🐟 | 2 cans | Drained, flaked with fork |
| Ramen Broth 🍲 | 4 cups | Any flavor, or homemade |
| Green Onions 🧅 | ¼ cup | Thinly sliced, white and green parts |
| Sesame Seeds 🌾 | 1 tbsp | Toasted for extra crunch |
| Soft-Boiled Eggs 🥚 | 2 whole | 6-minute eggs, peeled |
| Nori Strips 🍣 | 4 pieces | Crumbled or cut into ribbons |
| Sesame Oil 🫒 | 1 tsp | For aroma, not cooking |
| Soy Sauce 🍶 | 1 tbsp | For extra umami punch |
| Garlic Cloves 🧄 | 2 cloves | Minced for broth boost |
| Ginger 🌿 | 1 tsp | Freshly grated, optional |
| Butter 🧈 | 1 tbsp | For richness in broth |
| Salt 🧂 | ½ tsp | Adjust to taste |
| Black Pepper 🌶️ | ¼ tsp | Freshly ground |
The ramen noodles are your base, and honestly, any flavor works—spicy, miso, or even chicken. I usually grab the classic miso or spicy ramen from the store, but if you're feeling fancy, swap in fresh egg noodles for a lighter texture. The tuna? Wild-caught in water is ideal, but don’t stress if you’ve got oil-packed—just drain it well. For the broth, I often boost the store-bought stuff with a pat of butter, minced garlic, and a splash of soy sauce—trust me, it’s a game-changer. And if you’re short on time, instant miso paste makes a killer quick broth too.
No green onions? Substitute with chives or cilantro—they’re all in the same family, just different vibes. Sesame seeds too expensive? Toasted peanuts or crushed wasabi peas add crunch without breaking the bank. Soft-boiled eggs giving you trouble? Hard-boiled works too, but they won’t be as creamy. The nori strips? Grab them from the Asian aisle—Trader Joe’s or Whole Foods have the best selection. And if you’re out of sesame oil, a tiny bit of toasted sesame oil substitute (or even a dash of peanut butter) can save the day. The key is balancing textures—crunchy, creamy, and chewy all in one bowl!
Store your ramen noodles in an airtight container to keep them fresh—they last for months. The tuna? Once opened, transfer it to a sealed container and use within 2 days (or freeze it). Soft-boiled eggs keep for 1 week in the fridge if you peel and store them in cold water. This whole dish reheats beautifully—just add a splash of water or broth to loosen things up. And if you’re prepping ahead? Assemble the bowls without the toppings, store them separately, and add everything fresh before eating. Leftovers taste even better the next day—the flavors meld like crazy!
Why You'll Love This Recipe
- Pantry Magic: I swear by this one—open a can, boil water, dump in noodles. That’s it. The tuna adds protein without extra effort, and the broth does all the heavy lifting while I chop green onions in two minutes flat.
- Umami Bomb: The combo of tuna and ramen broth? Next-level savory. The tuna’s briny punch cuts through the richness of the broth, and a sprinkle of sesame seeds turns it into something that tastes like you slaved over it (but you didn’t).
- Lunchbox Hero: Pack it cold or reheat—this ramen holds up perfectly. I make a big batch on Sundays, toss in extra green onions for crunch, and it’s my go-to for office lunches or post-workout fuel. (Yes, even on a Tuesday night.)
- Budget Win: Tuna’s cheap, noodles are cheap, broth is cheap—this feeds two for under $3. Honestly, the only splurge is the sesame seeds, and I stretch those by using half the packet. Leftovers? Even better the next day.
Step-by-step instructions for canned tuna ramen
Here's how to make this umami-packed ramen in minutes—crunchy, creamy, and full of flavor!
🍳 Step 1: Cook the Broth to Perfection
In a medium saucepan, melt the 1 tablespoon butter over medium heat. Add the 2 cloves minced garlic cloves and 1 teaspoon freshly grated ginger, cooking for 30 seconds until fragrant—you should smell that fresh, zesty aroma. Pour in the 4 cups ramen broth and bring to a gentle simmer.
Stir in the 1 tablespoon soy sauce and let the broth bubble for 5 minutes. Taste and adjust seasoning with the 0.5 teaspoon salt and 0.25 teaspoon black pepper—this is your flavor base, so get it right! Keep the broth warm while you prep the rest.
🔪 Step 2: Prep All Toppings While Broth Simmers
While the broth cooks, thinly slice the 0.25 cup green onions (white and green parts) and set aside. Toast the 1 tablespoon sesame seeds in a dry skillet over low heat for 2 minutes until golden and nutty—watch them closely so they don't burn! Cut the 4 pieces nori strips into ribbons or crumble them for texture.
For the 2 whole soft-boiled eggs, carefully peel them (save the whites for another use if you like) and set aside at room temperature. Flake the 2 cans canned tuna in water with a fork and drain any excess liquid. The prep work is done—now it's time to assemble!
🍲 Step 3: Cook and Assemble the Ramen
Boil a pot of water and cook the 2 packages ramen noodles according to package instructions—usually 2-3 minutes for al dente texture. Drain and rinse briefly with cold water to stop cooking, then divide evenly into 4 bowls. Ladle the warm broth over the noodles until fully submerged.
Top each bowl with ½ of the flaked tuna, ½ of the green onions, ½ of the toasted sesame seeds, 1 nori strip, and 1 soft-boiled egg. Drizzle with 1 teaspoon sesame oil—this adds that nutty aroma that ties everything together. The contrast of textures—chewy noodles, creamy egg, crunchy nori—is what makes this ramen amazing!
🥘 Step 4: Serve Immediately for Maximum Flavor
Stir each bowl gently to distribute the toppings evenly. Taste and adjust seasoning—you might want a little more soy sauce or black pepper to taste. Serve right away while the broth is steaming hot and the noodles are tender.
Here's the thing—this ramen tastes even better the second time around. The noodles soak up the flavorful broth, and the toppings add layers of texture and umami. Don't skip the sesame oil drizzle—it's the secret to that restaurant-quality finish!
Pro Tips For Making Canned Tuna Ramen
- BOIL NOODLES SEPARATELY: The broth packet’s flavor is weak—don’t drown it in noodle starch. Cook the noodles in a separate pot with boiling water for 2 minutes less than the package says, then drain. Toss them straight into the broth afterward, and you’ll keep that clean, bright taste instead of a murky, gluey mess.
- DRAIN TUNA DRY: That water in the can is just salt and sadness. Drain the tuna, then rinse it under cold water and pat it really dry with a paper towel. Wet tuna makes the broth watery, and nobody wants a sad, diluted soup—especially when you’re paying for that rich, flaky texture.
- SAVE THE BROTH PACKET: Tossing the seasoning packet? Big mistake. Open it, dump half into your broth, and save the rest. Sprinkle it over the noodles at the end—it’s got umami magic that disappears if you cook it too long. (Yes, even if you’re using store-bought broth, it still makes a difference.)
- TOAST SESAME SEEDS FIRST: Skip the raw sprinkle—sesame seeds taste bland straight from the bag. Dry-toast them in a small pan over medium-low for 30 seconds until they smell nutty and golden. Let them cool, then scatter them on top for crunch and depth. (Pro move: Toast the green onions in the same pan for 10 seconds too—they’ll add a smoky kick.)
Storing and reheating this canned tuna ramen
Refrigerator Storage
Store your cooked ramen in an airtight container with a tight-fitting lid—glass or BPA-free plastic works best. Let it cool for no more than 2 hours before refrigerating to prevent bacterial growth. I use quart-sized glass containers from Central Market because they stack neatly and keep flavors fresh.
This dish stays delicious for 3-4 days in the fridge, with the tuna absorbing the broth's flavors even more deeply over time. 💛
Freezer-Friendly Prep
For longer storage, freeze the broth and noodles separately—this prevents sogginess. Portion the broth into silicone ice cube trays (about ½ cup per cube) and transfer to a freezer bag, squeezing out excess air.
Cook the noodles fresh when reheating, or freeze them in a single layer on a tray before bagging. The toppings (eggs, nori, sesame seeds) should be added fresh after reheating for best texture. Frozen ramen keeps for up to 3 months.
Reheating Like a Pro
Microwave reheating works best for convenience: Cover your bowl with a microwave-safe lid or damp paper towel and heat on medium power for 2-3 minutes, stirring halfway. For stovetop reheating, add 2 tablespoons water or broth to each bowl and simmer on low heat for 3-4 minutes until hot.
The key is gentle heat—high temps can turn the broth grainy or make the noodles mushy. Always taste and adjust seasoning after reheating.
Topping Strategy
Store toppings separately in small airtight containers—this keeps them crisp and fresh. Toast sesame seeds and chop green onions right before serving to maintain crunch. For eggs, peel and store them in ice water in the fridge for up to 5 days if prepping ahead.
Nori strips can be kept in a cool, dark place (like a pantry) for weeks. The secret to perfect reheated ramen? Fresh toppings make all the difference. ✨
Make-Ahead Assembly
Assemble bowls without toppings and store them in the fridge for up to 2 days. Keep toppings in a separate container. When ready to eat, simply reheat the noodle-broth base and add toppings fresh.
This method saves time and ensures your ramen stays crunchy and flavorful. I do this on busy weeknights—it’s a lifesaver when David’s hungry and I’m still chopping veggies for dinner. 💡
Nutrition facts
Frequently asked questions
Can I use oil-packed tuna instead of water-packed?
Yes, but you'll need to drain it thoroughly and rinse with cold water to remove excess oil. Oil-packed tuna has a richer flavor, which pairs beautifully with the umami broth. Just be mindful of the extra fat content—you might want to reduce the butter in the broth slightly to balance flavors.
What's the best way to make this dish vegetarian?
Swap the tuna for 1 cup marinated tofu or 2 cups chickpeas (drained and lightly mashed). For extra protein, add 2 soft-boiled eggs or ½ cup crispy fried onions. Boost the broth with 1 tablespoon miso paste and ½ teaspoon smoked paprika to maintain that savory depth.
How can I make this ramen spicier?
Add 1 teaspoon chili crisp or sriracha to the broth while simmering, or stir in ½ teaspoon red pepper flakes directly to your bowl. For extra heat, top with 1 teaspoon chopped fresh chili or a dash of chili oil. Start with small amounts—you can always add more!
Why did my ramen turn out too salty?
Store-bought ramen broth and canned tuna are often high in sodium. To fix it, add ½ cup hot water to each bowl and stir well to dilute the saltiness. For future batches, reduce the broth to 3 cups and add 1 extra cup water to balance flavors. Taste as you cook!
Can I make this with instant noodles?
Use 4 packets of instant ramen noodles (discard the seasoning packet) and follow the same cooking method. For extra richness, stir 1 tablespoon butter into the broth while simmering. The texture will be slightly lighter, but the flavor remains just as satisfying.